|
A Beginner's Guide to Mugen
*Note* - make sure to change all frontslashes in the extracting instructions to backslashes.
For some reason the site doesn't feel like displaying backslashes :p
This is an easy to follow section, on all you need to know to get started with Mugen.
I am assuming that you have some background information about winzip and exctracting files, but I briefly explain how to do these things as well.
Installing -
Once you get to www.mgbr.net and get to the mugen section, you should download the zip for Mugen version 0414 (the latest version). Characters for version 0627, 0731, 1129, 0401, and 0414 (not 0101) will work with this version of mugen. Don't worry about what those numbers mean, their just the version numbers given to some of the latest builds of Mugen. You will need an unzipping program such as winzip (recommended, found at www.winzip.com). Once you finish downloading MUGEN make sure you open it up in winzip CLASSIC (not wizard). Highlight ALL the files and click the extract button.
Once you have done that extract it to:
C:/WINDOWS/desktop/mugen/
Adding Characters -
Fist you have to find some characters. The best place to start is www.mgbr.net or mugenguild.cjb.net; Once you have found the character you are looking for open it up in winzip classic (just like mugen) and highlight all the files. In these files you should see a .def file. For instance if you are downloading Iorix from http://sander71113.mgbr.net he has a def file called iorix.def. the name of this file (in our case iorix) must be used to name the character's folder in the characters directory. In other words you would extract him into:
C:/WINDOWS/desktop/mugen/chars/iorix
After you extract iorix into his own folder you should go to it and check if you did it right. Go to your desktop and open mugen, then open the chars directory and then open the iorix folder. If you see a bunch of files in there you did it right! Then what you have to do is open up the data directory in your mugen folder and double click select.def. it will ask you what program to use to open it. at this point you have to go throught that list of programs and select WORDPAD. Then when the file is opened, you will see a heading "characters" under that you will see a bunch of text and then a line (above the extra stages heading) that says "kfm, stages/kfm.def" (this is not one of the lines with a semicolon (;) in front of it) put in your new chatacter's folder name (in our case iorix) under that kfm line, it should look like this:
;---------------------------------------------------------------------
[Characters]
kfm, stages/kfm.def
iorix
;-----------------------
[ExtraStages]
;Put extra stages here. They will be available in VS and Watch modes.
;For example, you can insert "stages/mybg.def".
;---------------------------------------------------------------------
[Options]
;Here you set the maximum number of matches to fight before game ends
;in Arcade Mode. The first number is the number of matches against
;characters with order=1, followed by order=2 and order=3 respectively.
;For example, for 4,3,1 you will fight up to 4 randomly-picked
;characters who have order=1, followed by 3 with order=2 and 1 with
;order=3.
arcade.maxmatches = 6,1,1,0,0,0,0,0,0,0
;Maximum number of matches to fight before game ends in Team Mode.
;Like arcade.maxmatches, but applies to Team Battle.
team.maxmatches = 4,1,1,0,0,0,0,0,0,0
;---------------------------------------
If you would like you can backspace all that text that has the semicolons (;) in front of every line.
After doing this 3 or 4 times it becomes REALLY easy and like second nature... thats it your done!
Now open up the mugen.exe file and you're ready to go!
;---------------------------------------------------------------------
Update - 12/01/01
In this section of the Mugen beginner's guide, I am going to explain how to build a custom slect screen, so that you can fit more than just ten characters (the original configuration) and so that you can have a 13 teams of 4 setup. First you need to copy the select.def in your data folder, and paste it into the data/big direcroy. A system.def file should already be there... keep in mind that all .def files are to be opened using text-based software such as notepad. The system.def and the select.def in the data/big directory, are the two files I will be teaching you how to use. Before continuing, make sure only to modify the two files in data/big, leave everything in data alone for now. First, you have to edit the select definition file, it should look something like this:
name
name
name
name
x
x
x
x
name
name
The first four space marked name are for character that you want to be visible, simply insert the names of your characters' folders. The next four spaces marked x, should stay that way, untouched, just four x's. They are there so that you will skip to the side of the screen when selecting a secret character. The last two spaces also marked name, will be used for character that you do not want to be slectable on-screen, secret characters. In order to access them, you simply press right one more time at the right-most slectable character. Then, all you have to do is copy and paste the configuration I have above, until it is in the select .def thirteen times. Make sure to leave a space between each time you paste, so that you can distinguish rows.
Before you will be able to use this new configuration, you also have to edit the system.def... Scroll down a bit after you open up the system file, and find the section that says "Character select screen definition," It should start with row and column values. Once you find it, delete all the text from there, down to "Character select screen background" and add this:
[Select Info]
rows = 13
columns = 10
wrapping = 0 ;1 to let cursor wrap around
pos = 104,20 ;Position to draw to
showEmptyBoxes = 0
moveOverEmptyBoxes = 0
cell.size = 27,13 ;x,y size of each cell (in pixels)
cell.spacing = 2 ;space between each cell
cell.bg.spr = 150,0 ;Note: Don't use animation for cells
cell.random.spr = 180,0 ;Icon for random select (don't use animation)
cell.random.switchtime = 4;Time to wait before changing to another random portrait
p1.cursor.startcell = 0,0
p1.cursor.active.spr = 160,0
p1.cursor.done.spr = 161,0
p1.cursor.move.snd = 100,0
p1.cursor.done.snd = 100,1
p1.random.move.snd = 100,0;*2001.04.01 NEW*
p2.cursor.startcell = 0,0
p2.cursor.active.spr = 170,0
p2.cursor.done.spr = 171,0
p2.cursor.blink = 1 ;1 to blink p2's cursor if overlapping p1's
p2.cursor.move.snd = 100,0
p2.cursor.done.snd = 100,1
p2.random.move.snd = 100,0;*2001.04.01 NEW*
random.move.snd.cancel = 0;*2001.04.01 NEW* 1 to have random move sound cancel itself when played repeatedly
stage.move.snd = 100,0 ;*2001.04.01 NEW*
stage.done.snd = 100,1 ;*2001.04.01 NEW*
cancel.snd = 100,2
portrait.offset = 0,0
portrait.scale = 1,1
title.offset = 159,13 ;Position of title (Arcade Mode, etc)
title.font = 1,0,0 ;Font of title (-1 for none)
;Big portraits
p1.face.offset = 1,56 ;Position to put big portrait
p1.face.scale = 1,1
p1.face.facing = 1 ;*2001.04.01 NEW*
p2.face.offset = 318,56
p2.face.scale = 1,1
p2.face.facing = -1 ;*2001.04.01 NEW*
;Name
p1.name.offset = 3,205 ;Position to put name
p1.name.font = 1,0,1 ;Set to -1 for no display
p2.name.offset = 316,205
p2.name.font = 1,0,-1
;Stage select
stage.pos = 160,236
stage.active.font = 4,0,0
stage.active2.font = 4,2 ;Second font color for blinking
stage.done.font = 4,0
;Team menu *2001.04.01 NEW* for below
teammenu.move.wrapping = 1
p1.teammenu.pos = 20, 30
;p1.teammenu.bg.spr =
p1.teammenu.selftitle.font = 1,0, 1
p1.teammenu.selftitle.text = Player
p1.teammenu.enemytitle.font = 1,0, 1
p1.teammenu.enemytitle.text = Opponent
p1.teammenu.move.snd = 100,0
p1.teammenu.value.snd = 100,0
p1.teammenu.done.snd = 100,1
p1.teammenu.item.offset = 0,20
p1.teammenu.item.spacing = 0,15
p1.teammenu.item.font = 1,0, 1
p1.teammenu.item.active.font = 1,0, 1
p1.teammenu.item.active2.font = 1,0, 1 ;Second font color for blinking
p1.teammenu.item.cursor.offset = -10, 0
p1.teammenu.item.cursor.anim = 180
p1.teammenu.value.icon.offset = 60,1
p1.teammenu.value.icon.spr = 181,0
p1.teammenu.value.empty.icon.offset = 60,1
p1.teammenu.value.empty.icon.spr = 182,0
p1.teammenu.value.spacing = 6,0
;p2 team
p2.teammenu.pos = 299, 30
;p2.teammenu.bg.spr =
p2.teammenu.selftitle.font = 1,0, -1
p2.teammenu.selftitle.text = Player
p2.teammenu.enemytitle.font = 1,0, -1
p2.teammenu.enemytitle.text = Opponent
p2.teammenu.move.snd = 100,0
p2.teammenu.value.snd = 100,0
p2.teammenu.done.snd = 100,1
p2.teammenu.item.offset = 0,20
p2.teammenu.item.spacing = 0,15
p2.teammenu.item.font = 1,0, -1
p2.teammenu.item.active.font = 1,0, -1
p2.teammenu.item.active2.font = 1,0, -1 ;Second font color for blinking
p2.teammenu.item.cursor.offset = 10, 0
p2.teammenu.item.cursor.anim = 190
p2.teammenu.value.icon.offset = -60,1
p2.teammenu.value.icon.spr = 191,0
p2.teammenu.value.empty.icon.offset = -60,1
p2.teammenu.value.empty.icon.spr = 192,0
p2.teammenu.value.spacing = -6,0
;Sounds
Remeber you are only deleting up until the word "Sounds" in the system def, leave everything from "Character select screen background" and below alone. Now, you should be ready to go... so save the files, and open up to your data/big directory. Then take the two files that we just edited (system and select) and paste them into the data folder. Say "yes" when asked to over-write.
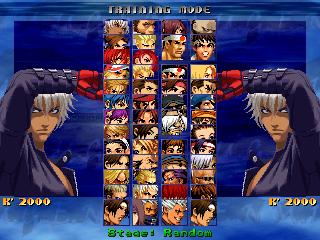
That's it... you're done! Enjoy your snazzy new select screen, it should look something like this:
That's it for now, check back for more updates often.
|

